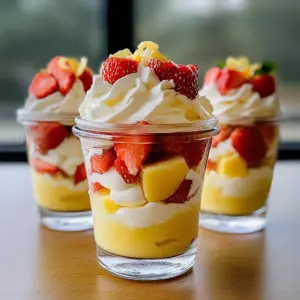
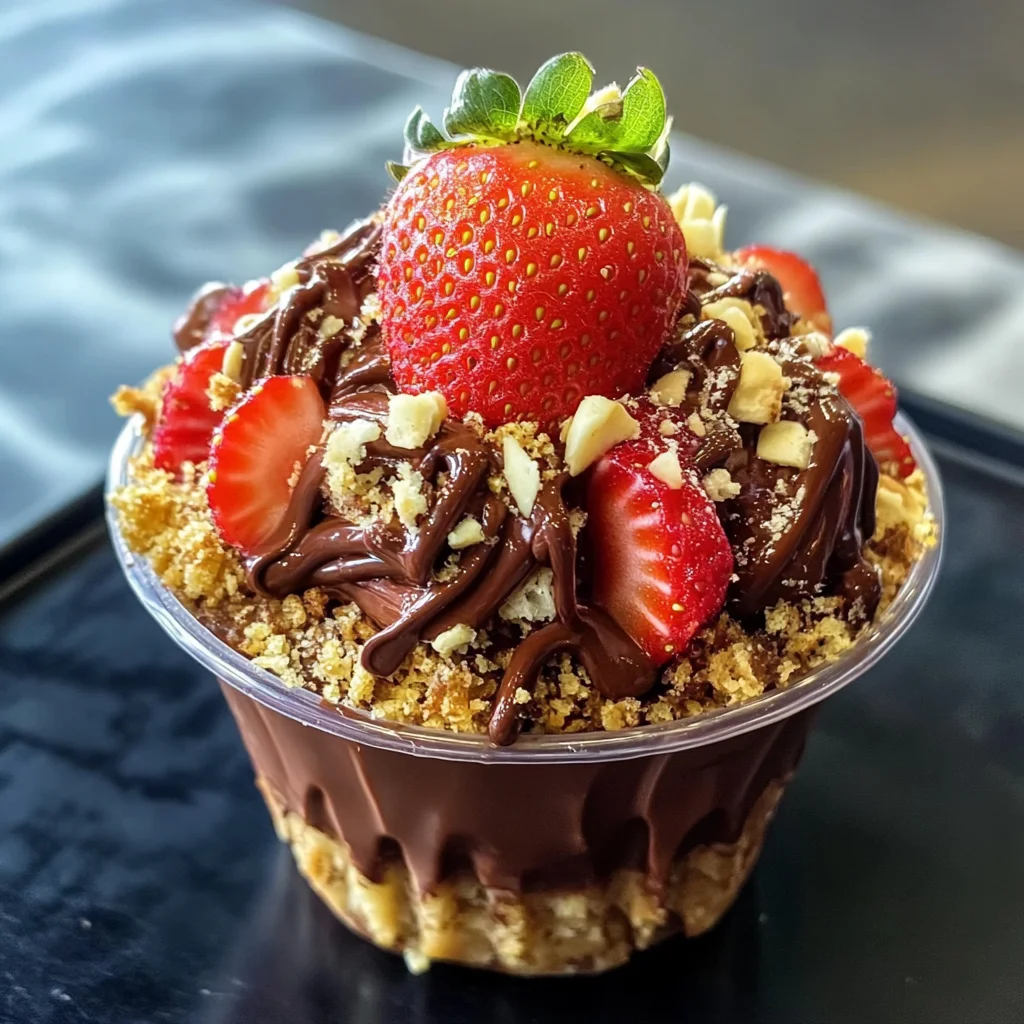
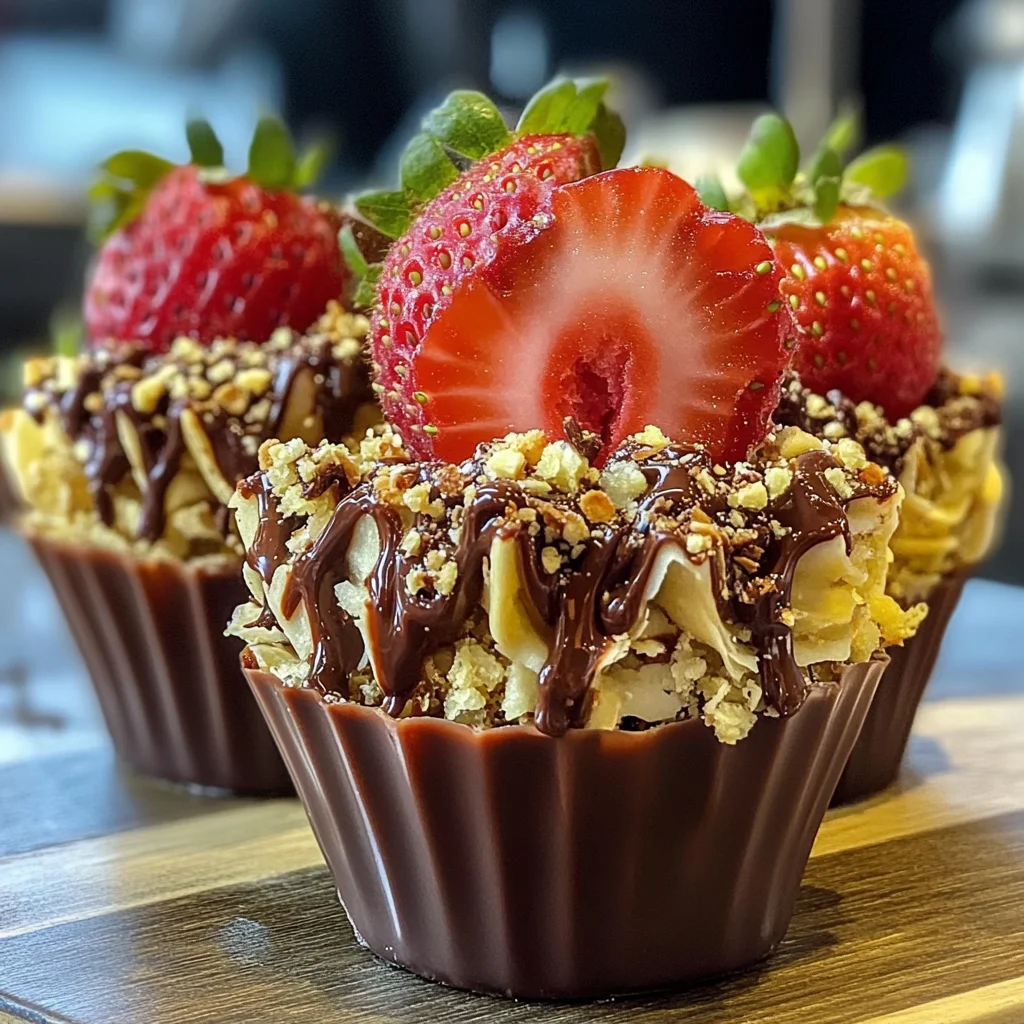
Chocolate Strawberry Cups are an easy, decadent dessert inspired by Dubai’s viral chocolate strawberry cup aesthetic. Layers of crispy kataifi, pistachio paste, fresh strawberries, and luscious Nutella create an indulgent treat ready in under 90 minutes. Perfect for parties, family gatherings, or a sweet indulgence at home, these cups are sure to impress.
Jump to:
- Why You’ll Love This Recipe
- Tools and Preparation
- Essential Tools and Equipment
- Importance of Each Tool
- Ingredients
- For the Base
- For the Filling
- For Topping
- How to Make Homemade Chocolate Strawberry Cups Recipe
- Step 1: Toast the Kataifi
- Step 2: Prepare the Pistachio Mixture
- Step 3: Prepare the Strawberries
- Step 4: Melt the Nutella
- Step 5: Assemble Your Cups
- Step 6: Final Touches
- How to Serve Homemade Chocolate Strawberry Cups Recipe
- Individual Dessert Cups
- Garnish with Fresh Mint
- Pair with Whipped Cream
- Serve with Coffee or Tea
- Create a Dessert Platter
- Accompany with Fruit Salad
- How to Perfect Homemade Chocolate Strawberry Cups Recipe
- Best Side Dishes for Homemade Chocolate Strawberry Cups Recipe
- Common Mistakes to Avoid
- Refrigerator Storage
- Freezing Homemade Chocolate Strawberry Cups Recipe
- Reheating Homemade Chocolate Strawberry Cups Recipe
- Frequently Asked Questions
- Can I customize my Homemade Chocolate Strawberry Cups Recipe?
- What are some variations of this recipe?
- How long does it take to prepare Homemade Chocolate Strawberry Cups?
- Are these cups suitable for vegan diets?
- Final Thoughts
- 📖 Recipe Card
Why You’ll Love This Recipe
- Quick and Easy: This recipe can be prepared in under 30 minutes, making it ideal for last-minute dessert cravings.
- Decadent Flavor: The combination of Nutella, fresh strawberries, and pistachio paste creates a rich and satisfying taste experience.
- Versatile Presentation: Serve these cups at birthdays, anniversaries, or casual get-togethers to wow your guests with their stunning appearance.
- Customizable Ingredients: Substitute ingredients based on dietary preferences or availability without sacrificing flavor.
- No Baking Required: Enjoy a delicious dessert without the hassle of baking—perfect for hot days!
Tools and Preparation
To make the Homemade Chocolate Strawberry Cups Recipe efficiently, gather the essential tools listed below. Having the right equipment will streamline your preparation process.
Essential Tools and Equipment
- Mixing bowl
- Microwave-safe bowl
- Spatula
- Dessert cups or glasses
Importance of Each Tool
- Mixing bowl: Essential for combining the kataifi and pistachio paste smoothly.
- Microwave-safe bowl: Ideal for melting Nutella quickly without burning it.
- Spatula: Helps layer ingredients neatly into the dessert cups for a beautiful presentation.
Ingredients
For the Base
- 75g kataifi (chopped; gluten-free sub: crushed rice noodles or cornflakes)
- 40g butter (plant-based for vegan)
For the Filling
- 140g pistachio paste (sub: almond butter or homemade pistachio blend)
- 600g fresh strawberries (thawed if frozen, pat dry)
For Topping
- 2 extra-large strawberries (for topping)
- 300g Nutella (sub: sugar-free chocolate or dark chocolate)
How to Make Homemade Chocolate Strawberry Cups Recipe
Step 1: Toast the Kataifi
- In a mixing bowl, melt the butter in a microwave-safe dish.
- Add chopped kataifi to the melted butter.
- Toast the mixture in a preheated skillet over medium heat until golden brown (about 5-7 minutes).
Step 2: Prepare the Pistachio Mixture
- Once the kataifi is toasted, mix in the pistachio paste.
- Optionally add a pinch of sea salt to enhance flavor.
Step 3: Prepare the Strawberries
- Wash and hull all fresh strawberries thoroughly.
- Cut them into halves or quarters as desired; pat them dry with paper towels.
Step 4: Melt the Nutella
- Place Nutella in a microwave-safe bowl.
- Heat it in short bursts of 15-20 seconds until it becomes glossy and easy to pour.
Step 5: Assemble Your Cups
- In each dessert cup, start by layering fresh strawberries at the bottom.
- Add a layer of the kataifi-pistachio mixture followed by a generous drizzle of melted Nutella.
- Repeat layering until you reach the top of each cup.
Step 6: Final Touches
- Top each cup with an extra-large strawberry for decoration.
- Sprinkle reserved kataifi on top for added crunch.
- Chill your assembled cups in the refrigerator for at least 2 hours before serving.
Enjoy these delightful Homemade Chocolate Strawberry Cups as an irresistible treat!
How to Serve Homemade Chocolate Strawberry Cups Recipe
Serving Homemade Chocolate Strawberry Cups is all about presentation and enhancing the experience. These delightful treats can be enjoyed in various ways, making them perfect for any occasion.
Individual Dessert Cups
- Serve each cup individually for a personal touch, making it easier for guests to enjoy their own dessert.
Garnish with Fresh Mint
- Add a sprig of fresh mint on top of each cup for a pop of color and refreshing flavor.
Pair with Whipped Cream
- A dollop of whipped cream on the side complements the rich flavors of the chocolate and strawberries beautifully.
Serve with Coffee or Tea
- Offering a warm beverage alongside the dessert elevates the tasting experience and balances the sweetness.
Create a Dessert Platter
- Arrange several cups on a decorative platter for an eye-catching centerpiece at parties or gatherings.
Accompany with Fruit Salad
- A light fruit salad can provide a refreshing contrast to the rich chocolatey flavor of the cups.
How to Perfect Homemade Chocolate Strawberry Cups Recipe
To make your Homemade Chocolate Strawberry Cups even more delightful, consider these helpful tips.
Use Quality Ingredients: Opt for high-quality chocolate and fresh strawberries to enhance flavor.
Chill Before Serving: Allowing the cups to chill for at least two hours helps set the layers perfectly.
Experiment with Flavors: Try adding different nut butters or flavored spreads for unique variations.
Make Ahead: Prepare the cups a day in advance so they’re ready when you need them.
Choose Right Glassware: Use clear glasses or cups to showcase the beautiful layers of your dessert.
Balance Sweetness: Adjust sugar levels in Nutella by using sugar-free alternatives if desired.
Best Side Dishes for Homemade Chocolate Strawberry Cups Recipe
Pairing side dishes with your Homemade Chocolate Strawberry Cups can enhance your dessert experience. Here are some great suggestions:
Vanilla Ice Cream: A classic pairing that adds creaminess and complements chocolate well.
Cheese Platter: Include mild cheeses like brie or goat cheese that contrast nicely with sweet flavors.
Chocolate Fondue: For chocolate lovers, serving fondue allows guests to dip strawberries and other fruits.
Mini Eclairs: These light pastries filled with cream add elegance and variety to your dessert spread.
Pistachio Cookies: Crunchy cookies echoing pistachio flavors will tie in beautifully with your cups.
Fruit Sorbet: A refreshing sorbet provides a fruity contrast that balances richness from the chocolate.
Coconut Macaroons: Chewy and sweet, these treats complement the strawberry-chocolate theme well.
Common Mistakes to Avoid
Making Homemade Chocolate Strawberry Cups can be simple, but there are a few common mistakes that can hinder your dessert’s quality. Here are some tips to ensure success:
- Using stale ingredients – Always check the freshness of your strawberries and other ingredients. Fresh ingredients mean better flavor and texture.
- Not toasting kataifi properly – Ensure you toast the kataifi until golden. This step adds essential crunch; undercooked kataifi will be chewy.
- Overheating Nutella – Melt the Nutella in short bursts in the microwave. Overheating can cause it to separate, leading to a less creamy texture.
- Skipping chilling time – Don’t rush this step! Chilling allows the layers to set properly, enhancing flavors and making them easier to serve.
- Ignoring layering technique – Layering is key for texture and visual appeal. Ensure you alternate layers evenly for a balanced bite.
Refrigerator Storage
- Store your Homemade Chocolate Strawberry Cups in an airtight container.
- They will last up to 3 days in the refrigerator without losing their deliciousness.
Freezing Homemade Chocolate Strawberry Cups Recipe
- It’s best not to freeze these cups as they may lose their texture. However, if necessary:
- Wrap each cup tightly in plastic wrap and place them in a freezer-safe container.
- They can last up to 1 month frozen but may change in consistency once thawed.
Reheating Homemade Chocolate Strawberry Cups Recipe
- Oven – Preheat your oven to 350°F (175°C). Place cups on a baking sheet for about 5 minutes until warmed.
- Microwave – Heat each cup for about 15-20 seconds on medium power. Be cautious not to overheat.
- Stovetop – Use a double boiler method, heating gently until just warm.
Frequently Asked Questions
Can I customize my Homemade Chocolate Strawberry Cups Recipe?
Yes! You can use different nut butters or fruits based on personal preference. Almond butter or even caramel sauce works well.
What are some variations of this recipe?
You could try adding crushed cookies between layers or drizzling with white chocolate for a unique twist on the traditional recipe.
How long does it take to prepare Homemade Chocolate Strawberry Cups?
From start to finish, including chilling time, the total preparation can take around 90 minutes.
Are these cups suitable for vegan diets?
Absolutely! Just substitute with plant-based butter and use sugar-free chocolate instead of Nutella for a vegan-friendly option.
Final Thoughts
These Homemade Chocolate Strawberry Cups are not only visually stunning but also deliciously indulgent. The combination of flavors and textures makes them perfect for any occasion. Feel free to customize with your favorite nuts, fruits, or spreads to make them uniquely yours!
Did You Enjoy Making This Recipe? Please rate this recipe with ⭐⭐⭐⭐⭐ or leave a comment.
📖 Recipe Card
Print
Homemade Chocolate Strawberry Cups
- Total Time: 40 minutes
- Yield: Serves 4
Description
Indulge in the delightful experience of Homemade Chocolate Strawberry Cups, a luxurious dessert that beautifully marries rich Nutella, fresh strawberries, and a crispy kataifi base. Inspired by the viral dessert trend from Dubai, these cups are not only visually stunning but also incredibly easy to prepare. In under 90 minutes, you can create an impressive treat that will wow your guests at any gathering or satisfy your sweet tooth at home. Perfect for parties, family events, or simply as a personal indulgence, these layered cups are sure to become a favorite.
Ingredients
- 75g kataifi (chopped; gluten-free sub: crushed rice noodles or cornflakes)
- 40g butter (plant-based for vegan)
- 140g pistachio paste (sub: almond butter or homemade pistachio blend)
- 600g fresh strawberries (thawed if frozen, pat dry)
- 300g Nutella (sub: sugar-free chocolate or dark chocolate)
- 2 extra-large strawberries (for topping)
Instructions
- Toast the kataifi in melted butter over medium heat until golden brown (5-7 minutes).
- Mix toasted kataifi with pistachio paste and a pinch of sea salt.
- Prepare strawberries by washing, hulling, and cutting them.
- Melt Nutella in short bursts in the microwave until glossy.
- Layer fresh strawberries, the kataifi-pistachio mix, and Nutella in dessert cups.
- Top with an extra strawberry and chill for at least 2 hours before serving.
- Prep Time: 30 minutes
- Cook Time: 10 minutes
- Category: Dessert
- Method: No-bake
- Cuisine: International
Nutrition
- Serving Size: 1 cup (150g)
- Calories: 365
- Sugar: 27g
- Sodium: 150mg
- Fat: 22g
- Saturated Fat: 8g
- Unsaturated Fat: 13g
- Trans Fat: 0g
- Carbohydrates: 34g
- Fiber: 3g
- Protein: 6g
- Cholesterol: 15mg