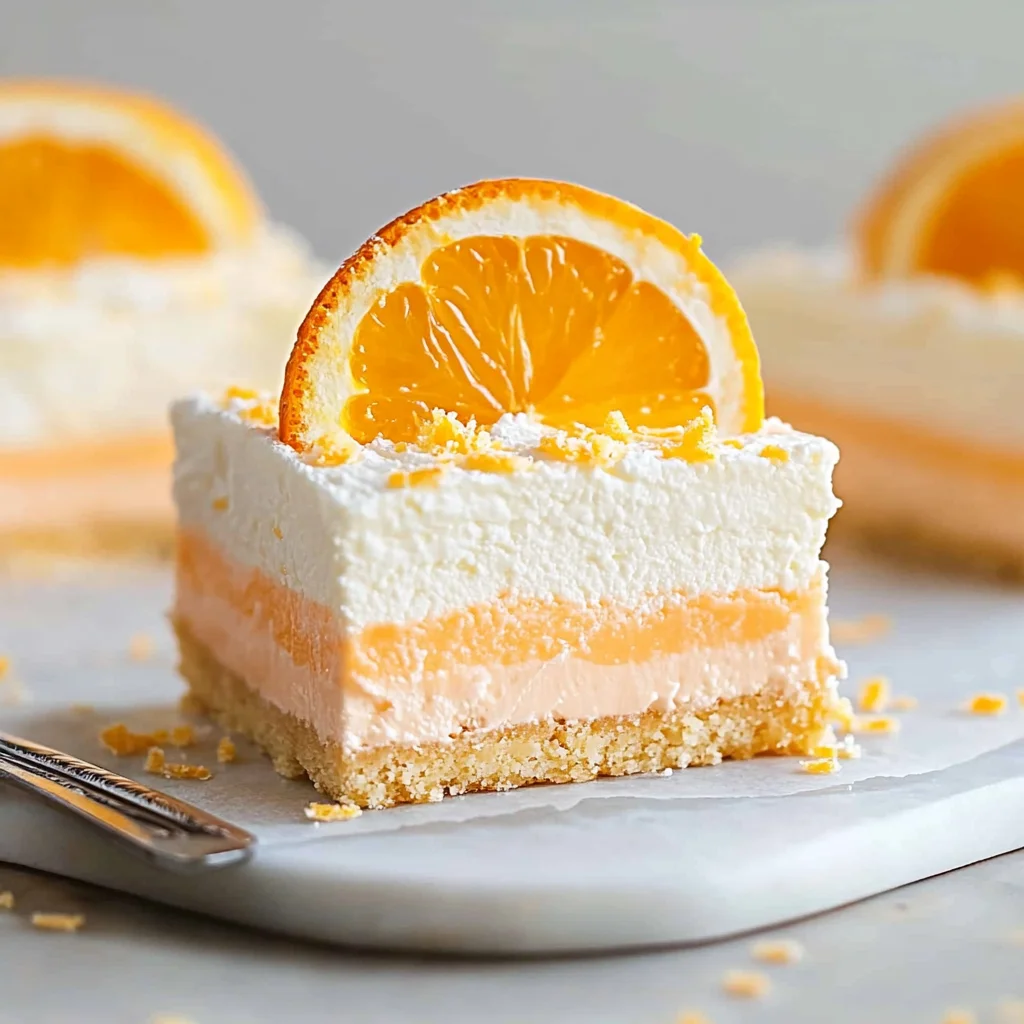
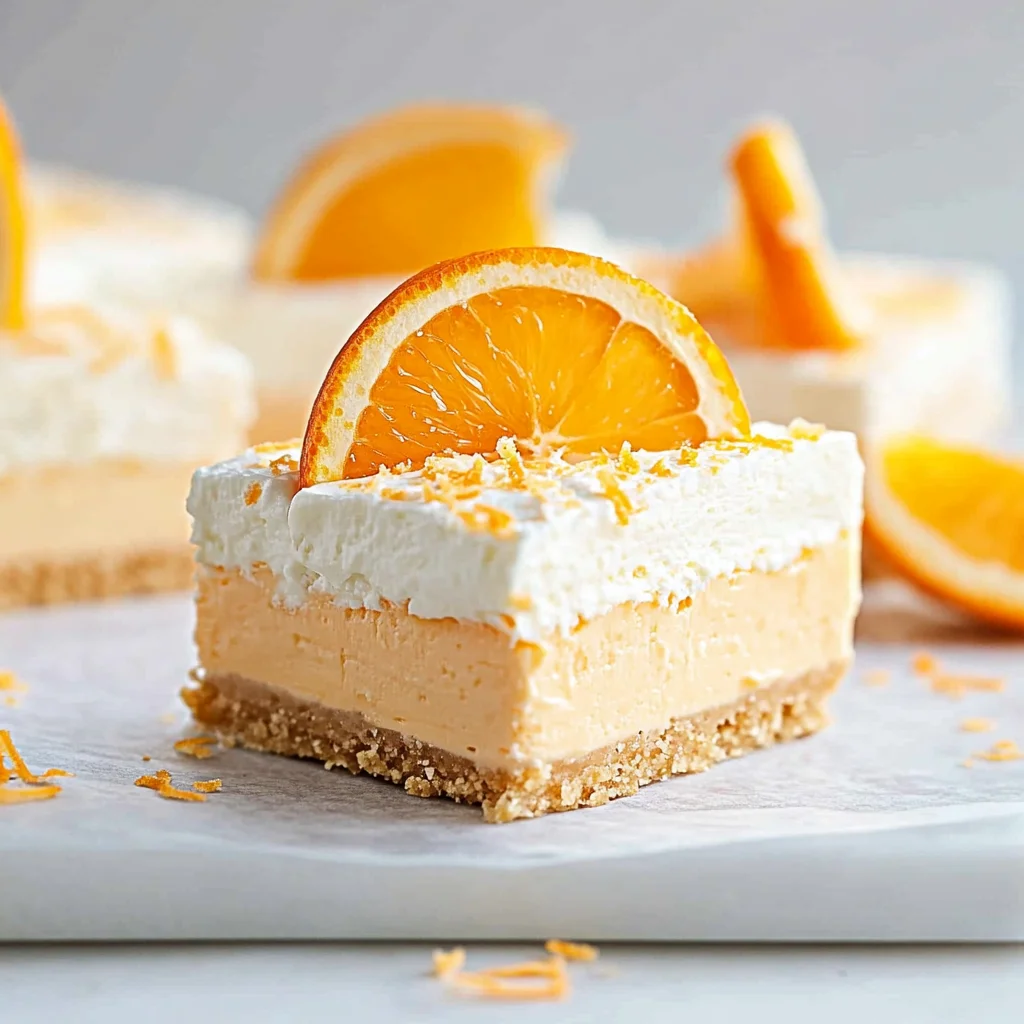
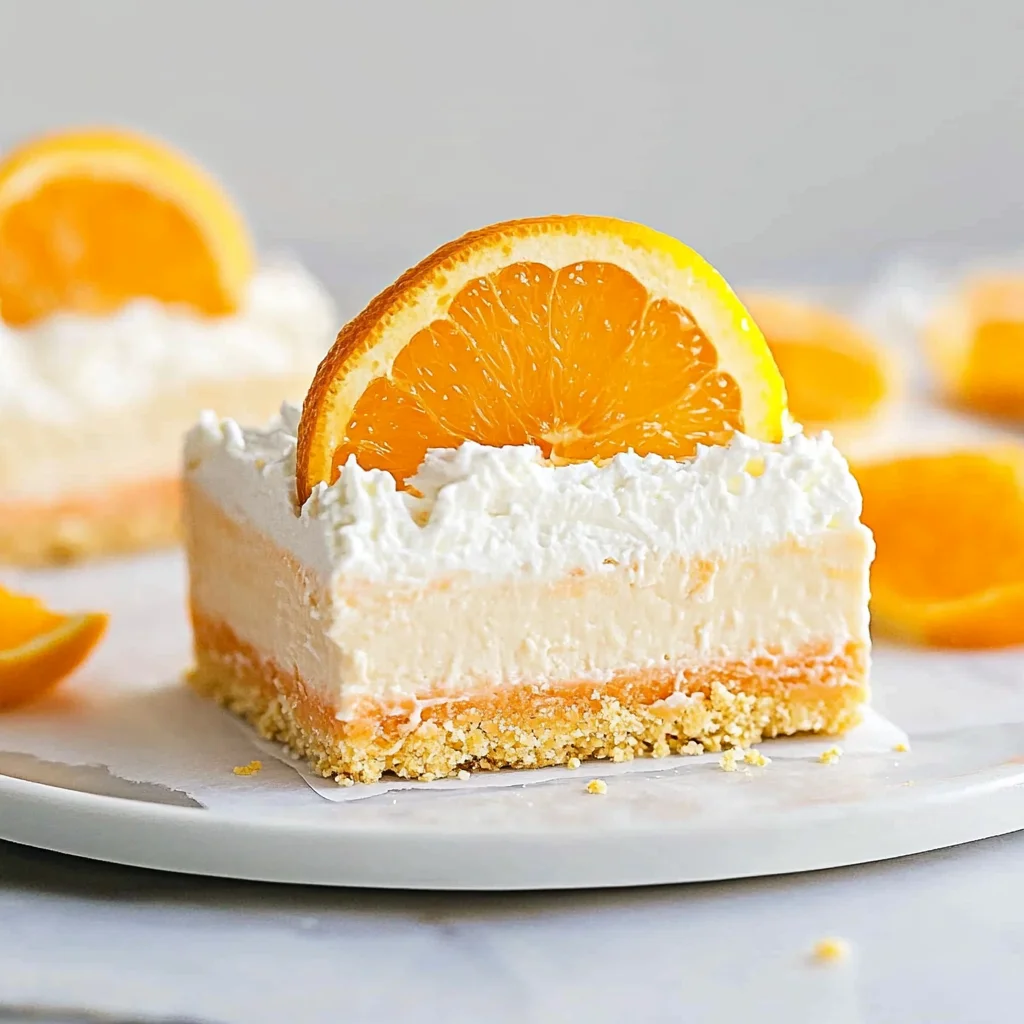
These Orange Creamsicle Dream Bars are a delightful no-bake dessert that captures the essence of summer. With their crunchy crust, sweet cheesecake layer, and refreshing orange cream topping, these bars are sure to please everyone in your family. Perfect for gatherings, picnics, or simply as a treat at home, they offer a unique blend of flavors that evoke nostalgia. Their vibrant colors and creamy texture make them a standout choice for any occasion.
Jump to:
- Why You’ll Love This Recipe
- Tools and Preparation
- Essential Tools and Equipment
- Importance of Each Tool
- Ingredients
- For Garnish
- How to Make Orange Creamsicle Dream Bars
- Step 1: Prepare the Nilla Wafer Crust
- Step 2: Create the Orange Gelatin
- Step 3: Make the Orange Cream Layer
- Step 4: Prepare the Cheesecake Layer
- Step 5: Assemble Everything Together
- How to Serve Orange Creamsicle Dream Bars
- Individual Portions
- Topped with Fresh Fruit
- Drizzled with Chocolate Sauce
- Served with Whipped Cream
- Garnished with Mint Leaves
- With a Side of Ice Cream
- How to Perfect Orange Creamsicle Dream Bars
- Best Side Dishes for Orange Creamsicle Dream Bars
- Common Mistakes to Avoid
- Storage & Reheating Instructions
- Refrigerator Storage
- Freezing Orange Creamsicle Dream Bars
- Reheating Orange Creamsicle Dream Bars
- Frequently Asked Questions
- Can I use different flavored gelatin for the Orange Creamsicle Dream Bars?
- How do I make my Orange Creamsicle Dream Bars healthier?
- Can I make Orange Creamsicle Dream Bars ahead of time?
- What if I don’t have Nilla Wafers?
- Final Thoughts
- 📖 Recipe Card
Why You’ll Love This Recipe
- No-Bake Convenience – These bars require no baking, making them easy to prepare and perfect for hot days.
- Delicious Flavor Combination – The mix of orange and cream cheese creates a refreshing taste that is both sweet and tangy.
- Family-Friendly – Kids and adults alike will enjoy this treat; it’s perfect for family gatherings.
- Make Ahead – They can be prepared in advance and stored in the refrigerator until you’re ready to serve.
- Versatile Options – Customize with different flavors or toppings to suit your preferences.
Tools and Preparation
Before you start making these delicious Orange Creamsicle Dream Bars, gather your tools. Having everything on hand will streamline the process.
Essential Tools and Equipment
- Mixing bowls
- Food processor
- Rubber spatula
- Measuring cups
- 8 X 8-inch baking pan
- Offset spatula
Importance of Each Tool
- Mixing bowls – Essential for combining ingredients smoothly without spilling.
- Food processor – Makes crushing cookies quick and easy for the crust.
- Rubber spatula – Perfect for folding ingredients together without deflating mixtures.
- Offset spatula – Helps spread layers evenly, ensuring a beautiful presentation.
Ingredients
These Orange Creamsicle Dream Bars are the perfect no-bake dessert for summer! Your whole family will love the crunchy crust, sweet cheesecake layer, and refreshing orange cream topping.
- 8 ounces Cool Whip (divide into 3 separate cups)
- 1 ⅓ cups Nilla Wafer Cookie Crumbs
- 5 tablespoons unsalted butter
- 3 ounces orange gelatin
- 3/4 cup boiling water
- 3/4 cup cold water
- 8 ounces cream cheese (room temperature)
- 1/4 cup powdered sugar
- 2 teaspoons orange extract
- 8 drops orange Wilton Gel Food Color (optional)
- 2 cups Cool Whip
- 8 ounces cream cheese (room temperature)
- 1 cup confectioners’ sugar
- 1 teaspoon pure vanilla extract
- 1 cup Cool Whip
For Garnish
- 2 tablespoons fresh parsley, finely chopped
How to Make Orange Creamsicle Dream Bars
Step 1: Prepare the Nilla Wafer Crust
- Line an 8 X 8-inch baking pan with parchment paper to help remove the bars easily later.
- Melt the 5 tablespoons of butter in a microwave-safe bowl for about 30 seconds. Stir well and melt further if needed for another 5-10 seconds.
- In a food processor, pulse the Nilla Wafers until they become fine crumbs.
- Combine cookie crumbs with melted butter using a rubber spatula until fully mixed.
- Spread the mixture evenly into the prepared baking pan, pressing down firmly to form a crust. Freeze it for at least 30 minutes while preparing other layers.
Step 2: Create the Orange Gelatin
- In a 2-cup measuring glass, dissolve the orange gelatin in 3/4 cup boiling water by stirring well.
- Add 3/4 cup cold water to the mixture and stir again. Place it in the refrigerator until cooled but not set—about 10 minutes.
Step 3: Make the Orange Cream Layer
- In a mixing bowl, beat together 8 ounces of cream cheese with powdered sugar, orange extract, and optional food coloring until smooth.
- Gradually pour in the cooled gelatin mix while mixing continuously. This ensures a smoother consistency. Once blended well, refrigerate it to thicken for about one hour.
Step 4: Prepare the Cheesecake Layer
- Beat another 8 ounces of cream cheese with confectioners’ sugar and vanilla until creamy.
- Fold in one cup of Cool Whip gently using a rubber spatula until combined.
- Dollop this cheesecake mixture onto your frozen crust and spread evenly using an offset spatula.
Step 5: Assemble Everything Together
- Combine remaining Cool Whip (about 2 cups) into your chilled Orange Cream mixture carefully until smooth.
- Pour this Orange Cream over the cheesecake layer and spread evenly with an offset spatula.
- Refrigerate overnight or at least for six hours before cutting into bars and serving.
Enjoy these delightful Orange Creamsicle Dream Bars as a refreshing dessert that everyone will love!
How to Serve Orange Creamsicle Dream Bars
These Orange Creamsicle Dream Bars are a delightful treat that can be served in various ways to enhance your dessert experience. Here are some serving suggestions to make the most out of this refreshing no-bake dessert.
Individual Portions
- Use small dessert cups or glasses for individual servings. This makes it easy for guests to enjoy their own portion without cutting into the main dish.
Topped with Fresh Fruit
- Add slices of fresh oranges or mandarin segments on top for a burst of color and added flavor. The citrus complements the creamy layers beautifully.
Drizzled with Chocolate Sauce
- A drizzle of chocolate sauce can add a touch of elegance and contrast to the sweet orange flavor. Use a squeeze bottle for an artistic touch.
Served with Whipped Cream
- Top each bar with extra Cool Whip or homemade whipped cream for added creaminess. This enhances the overall texture and flavor.
Garnished with Mint Leaves
- A sprig of fresh mint on each serving adds a pop of color and a refreshing hint. It elevates the presentation effortlessly.
With a Side of Ice Cream
- Pairing these bars with a scoop of vanilla or orange sorbet can create an indulgent dessert experience. The cold ice cream balances the creamy bars nicely.
How to Perfect Orange Creamsicle Dream Bars
To ensure your Orange Creamsicle Dream Bars turn out perfectly, consider these helpful tips that will guide you through the process.
- Chill Thoroughly: Make sure to chill each layer adequately before adding the next. This helps maintain distinct layers and prevents them from mixing together.
- Use Room Temperature Ingredients: Allow cream cheese to reach room temperature before mixing. This ensures a smoother texture without lumps.
- Don’t Rush the Gelatin: Allow the gelatin mixture to cool completely before adding it to other ingredients. This helps maintain the integrity and prevents melting other components.
- Experiment with Food Coloring: If desired, adjust the amount of orange food coloring for a more vibrant appearance. Just a few drops can make a big difference in presentation.
- Slice with Care: Use a sharp knife dipped in warm water for cleaner cuts when slicing the bars. This prevents sticking and ensures neat portions.
- Store Properly: Keep any leftovers covered in the fridge. These bars maintain their taste better when stored properly, ideally in an airtight container.
Best Side Dishes for Orange Creamsicle Dream Bars
Pairing side dishes with your Orange Creamsicle Dream Bars can enhance your meal’s overall experience. Here are some delightful options that complement this sweet treat beautifully:
- Fruit Salad
A fresh mix of seasonal fruits provides a refreshing balance to rich desserts like these bars. - Vanilla Ice Cream
Creamy vanilla ice cream pairs wonderfully, offering a classic combination that never disappoints. - Lemon Sorbet
The tartness of lemon sorbet contrasts well with sweet flavors, adding a refreshing element to your dessert table. - Cheesecake Bites
Mini cheesecake bites provide another creamy option that complements the texture of Orange Creamsicle Dream Bars perfectly. - Chocolate-Dipped Strawberries
Sweet strawberries dipped in chocolate add elegance and fun while keeping things light and fresh alongside these bars. - Pineapple Skewers
Grilled or fresh pineapple skewers bring tropical vibes that pair nicely with the citrus flavors in this dessert.
Common Mistakes to Avoid
Making Orange Creamsicle Dream Bars can be a delightful experience, but there are common pitfalls. Here are some mistakes to avoid:
- Skipping the chilling time: Not allowing the gelatin mixture to cool properly can lead to a lumpy texture. Always let it chill for about 10 minutes before mixing.
- Using warm ingredients: If the cream cheese is not at room temperature, it won’t blend smoothly. Be sure to let it sit out for at least 30 minutes before using.
- Overmixing the layers: Mixing the orange cream too vigorously can introduce air bubbles. Gently fold in ingredients for a smoother finish.
- Not lining the pan: Skipping parchment paper can make it difficult to remove the bars after they set. Always line your baking dish for easy removal.
- Cutting too soon: Cutting the bars before they have fully set can result in messy slices. Ensure they chill overnight or for at least 6 hours.
Storage & Reheating Instructions
Refrigerator Storage
- Keep your Orange Creamsicle Dream Bars in an airtight container.
- They will stay fresh for up to 5 days in the refrigerator.
- Place a piece of parchment paper between layers if stacking for extra protection.
Freezing Orange Creamsicle Dream Bars
- Wrap individual bars tightly in plastic wrap or foil.
- Store them in an airtight container or freezer bag.
- They will last up to 3 months in the freezer.
Reheating Orange Creamsicle Dream Bars
- Oven: Preheat your oven to 300°F (150°C). Place bars on a baking sheet and heat for about 10 minutes until slightly softened.
- Microwave: Heat individual slices on high for about 15-20 seconds, checking frequently to avoid melting.
- Stovetop: Use a skillet on low heat, covering with a lid. Heat for several minutes, monitoring closely to maintain texture.
Frequently Asked Questions
Can I use different flavored gelatin for the Orange Creamsicle Dream Bars?
Yes, you can experiment with different flavors of gelatin! Just remember that this will change the overall flavor profile of your dessert.
How do I make my Orange Creamsicle Dream Bars healthier?
Try using low-fat cream cheese and sugar substitutes. You can also reduce the amount of Cool Whip used in the recipe.
Can I make Orange Creamsicle Dream Bars ahead of time?
Absolutely! These bars actually taste better when made a day ahead, as they allow flavors to meld together.
What if I don’t have Nilla Wafers?
You can substitute Nilla Wafers with graham crackers or any sweet cookie crumbs you prefer!
Final Thoughts
These Orange Creamsicle Dream Bars are not only easy to make but incredibly refreshing as well. Their creamy texture and vibrant flavor make them perfect for summer gatherings or as a sweet treat anytime. Feel free to customize them by adding toppings like crushed nuts or sprinkles! Give this recipe a try and enjoy a delightful dessert that everyone will love!
Did You Enjoy Making This Recipe? Please rate this recipe with ⭐⭐⭐⭐⭐ or leave a comment.
📖 Recipe Card
Print
Orange Creamsicle Dream Bars
- Total Time: 30 minutes
- Yield: Approximately 9 servings 1x
Description
Indulge in the vibrant flavors of summer with these Orange Creamsicle Dream Bars. This delightful no-bake dessert features a crunchy Nilla wafer crust, a luscious cream cheese filling, and a refreshing orange gel topping. Perfect for family gatherings, picnics, or simply as a sweet treat at home, these bars are not only easy to make but also visually stunning with their bright colors and creamy textures. The combination of sweet and tangy flavors will evoke nostalgia while pleasing palates of all ages. Simple to prepare and ideal for make-ahead snacking, these Orange Creamsicle Dream Bars are sure to become a favorite in your household!
Ingredients
- 8 ounces Cool Whip (divided)
- 1 ⅓ cups Nilla Wafer Cookie Crumbs
- 5 tablespoons unsalted butter
- 3 ounces orange gelatin
- 3/4 cup boiling water
- 3/4 cup cold water
- 8 ounces cream cheese (room temperature)
- 1/4 cup powdered sugar
- 2 teaspoons orange extract
- 8 drops orange Wilton Gel Food Color (optional)
- 2 cups Cool Whip
- 1 cup confectioners' sugar
- 1 teaspoon pure vanilla extract
- 2 tablespoons fresh parsley, finely chopped (for garnish)
Instructions
- Prepare the crust by mixing Nilla wafer crumbs with melted butter. Press into an 8 x 8-inch lined baking pan and freeze.
- Dissolve orange gelatin in boiling water, then mix with cold water. Chill until cool but not set.
- Blend cream cheese with powdered sugar and orange extract until smooth. Gradually add the cooled gelatin mixture and refrigerate.
- For the cheesecake layer, beat cream cheese with confectioners' sugar and vanilla, then fold in Cool Whip.
- Layer the cheesecake on the crust, followed by the orange cream layer. Refrigerate overnight before serving.
- Prep Time: 30 minutes
- Cook Time: 0 minutes
- Category: Dessert
- Method: No-Bake
- Cuisine: American
Nutrition
- Serving Size: 1 serving
- Calories: 180
- Sugar: 12g
- Sodium: 160mg
- Fat: 10g
- Saturated Fat: 6g
- Unsaturated Fat: 4g
- Trans Fat: 0g
- Carbohydrates: 19g
- Fiber: <1g
- Protein: 2g
- Cholesterol: 25mg