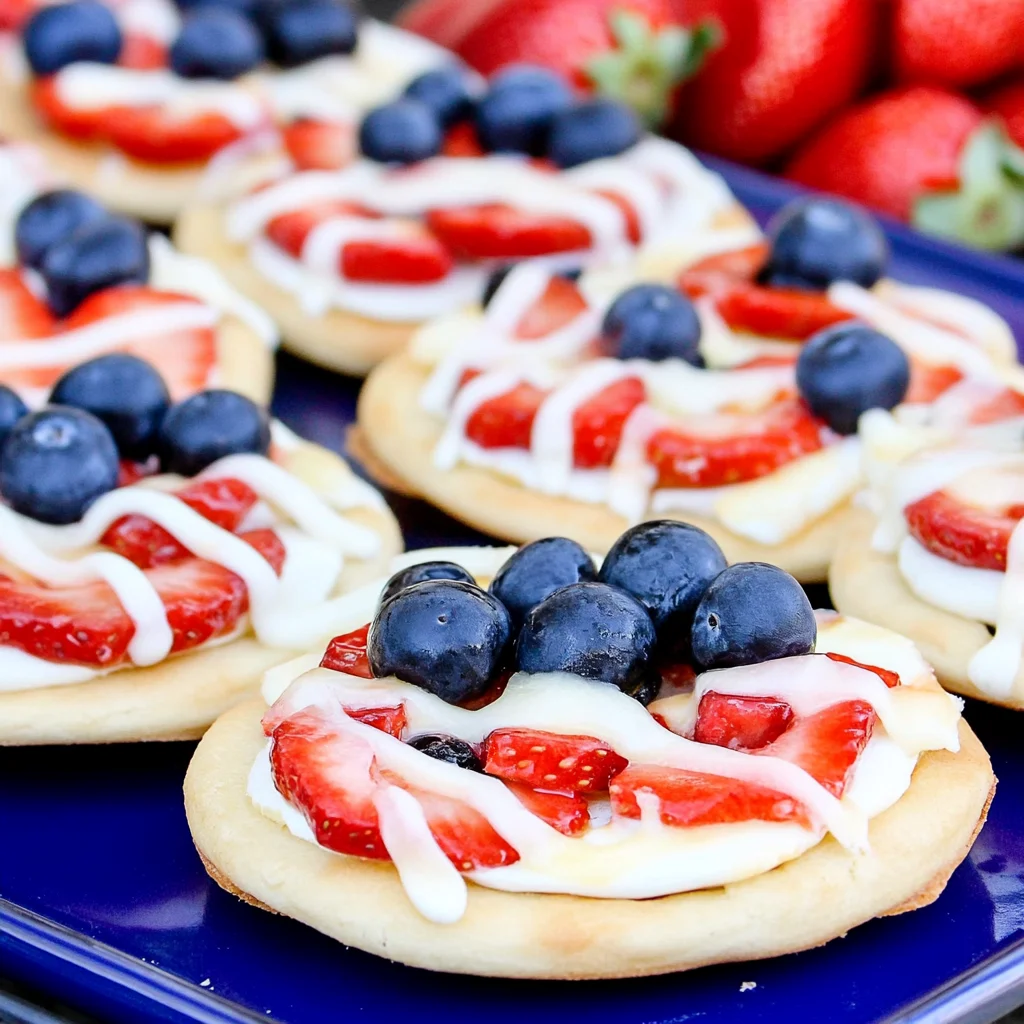
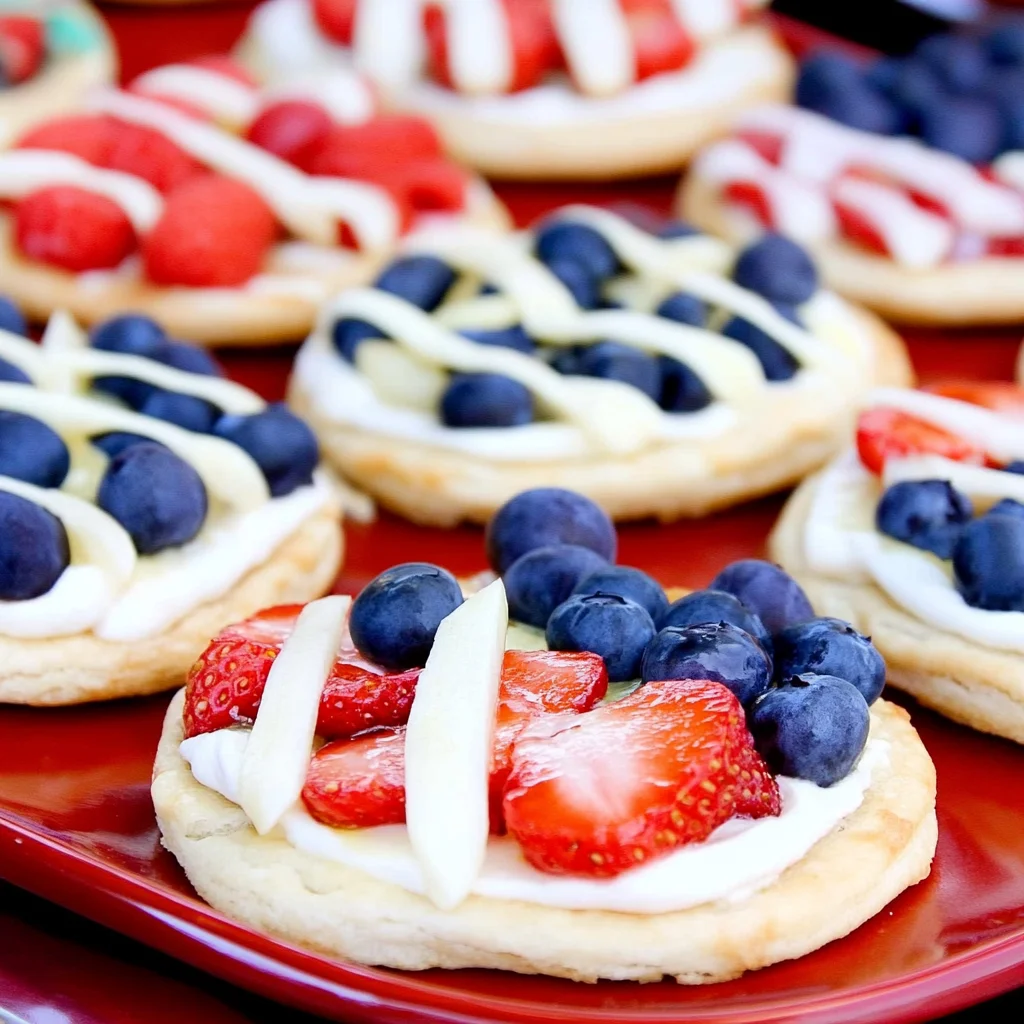
Mini Fruit Pizzas are a delightful treat that combines a sweet sugar cookie crust with a creamy topping and colorful fruits. These tasty bites are perfect for parties, picnics, or any gathering where you want to impress your guests. With their vibrant presentation and irresistible flavors, Mini Fruit Pizzas will surely be the star of the show!

Jump to:
- Why You’ll Love This Recipe
- Tools and Preparation
- Essential Tools and Equipment
- Importance of Each Tool
- Ingredients
- For the Cookie Crust
- For the Topping
- For Garnish
- How to Make Mini Fruit Pizzas
- Step 1: Preheat the Oven
- Step 2: Cream the Butter and Sugar
- Step 3: Add Wet Ingredients
- Step 4: Incorporate Flour
- Step 5: Shape the Dough
- Step 6: Bake the Cookie Crusts
- Step 7: Cool Down
- Step 8: Whip Heavy Cream
- Step 9: Prepare Cream Cheese Mixture
- Step 10: Fold in Whipped Cream
- Step 11: Assemble Mini Fruit Pizzas
- Step 12: Chill Again
- Step 13: Add Fruits
- Step 14: Drizzle with Chocolate
- Step 15: Final Chill
- How to Serve Mini Fruit Pizzas
- Individual Servings
- Platter Presentation
- Garnished with Mint
- Accompanied by Whipped Cream
- How to Perfect Mini Fruit Pizzas
- Best Side Dishes for Mini Fruit Pizzas
- Common Mistakes to Avoid
- Refrigerator Storage
- Freezing Mini Fruit Pizzas
- Reheating Mini Fruit Pizzas
- Frequently Asked Questions
- What are Mini Fruit Pizzas?
- Can I customize my Mini Fruit Pizzas?
- How do I make Mini Fruit Pizzas healthier?
- Can I use store-bought cookie dough?
- Final Thoughts
- 📖 Recipe Card
Why You’ll Love This Recipe
- Easy to Make: This recipe is simple enough for bakers of all skill levels, making it a fun kitchen project.
- Customizable Topping: Use your favorite fruits or whatever is in season for a personal touch.
- Perfect for Any Occasion: Whether it’s a birthday party or a summer BBQ, these Mini Fruit Pizzas fit right in.
- Visually Appealing: Their colorful appearance makes them an attractive addition to any dessert table.
- Deliciously Creamy: The fluffy cream cheese topping pairs wonderfully with the sweet fruits and cookie base.
Tools and Preparation
Before you start making your Mini Fruit Pizzas, gather your tools. Having everything on hand will streamline the cooking process and ensure you’re ready to create these delicious treats.
Essential Tools and Equipment
- Mixing bowl
- Electric mixer
- Measuring cups and spoons
- Rolling pin
- Cookie cutter (round shape)
- Baking sheet
Importance of Each Tool
- Mixing bowl: A spacious bowl allows you to mix ingredients thoroughly without making a mess.
- Electric mixer: This tool helps achieve the perfect creamy texture quickly, especially when whipping cream.
Ingredients
With a sugar cookie crust, a creamy and fluffy topping, juicy berries, and a drizzle of white chocolate, these are sure to be a hit with everyone!
For the Cookie Crust
- 1/4 c. butter
- 3/4 c. sugar
- 1 egg
- 1/8 tsp. salt
- 1 tsp. cream of tartar
- 1/2 tsp. baking soda
- 1 1/3 c. flour
For the Topping
- 1 cup heavy whipping cream
- 8 oz. cream cheese, softened to room temperature
- 3/4 c. powdered sugar
For Garnish
- Various fruits (strawberries, blueberries, kiwi, etc.)
- Melted white chocolate (for drizzling)
How to Make Mini Fruit Pizzas
Step 1: Preheat the Oven
Preheat your oven to 350 degrees Fahrenheit. This ensures that your Mini Fruit Pizzas bake evenly.
Step 2: Cream the Butter and Sugar
In a mixing bowl, cream together:
1. 1/4 cup butter
2. 3/4 cup sugar
Use an electric mixer on medium speed until light and fluffy.
Step 3: Add Wet Ingredients
To the creamed mixture, add:
1. 1 egg
2. 1/8 teaspoon salt
3. 1 teaspoon cream of tartar
4. 1/2 teaspoon baking soda
Mix until well combined.
Step 4: Incorporate Flour
Gradually add:
– 1 1/3 cups flour
Mix until all ingredients are combined into a dough.
Step 5: Shape the Dough
Press the dough firmly together:
– Roll it out on a floured surface.
– Use a round cookie cutter to cut out circles.
Step 6: Bake the Cookie Crusts
Place the circles on a greased baking sheet:
– Bake for 15-18 minutes or until golden brown.
Step 7: Cool Down
Once baked, remove from the oven and let cool:
– Chill in the refrigerator for 30-40 minutes to firm up.
Step 8: Whip Heavy Cream
In another mixing bowl:
– Whip together 1 cup heavy whipping cream until fluffy.
– Chill for an additional 10-15 minutes if necessary.
Step 9: Prepare Cream Cheese Mixture
In another bowl:
– Beat 8 oz. cream cheese until smooth.
– Gradually add in 3/4 cup powdered sugar, mixing until fully combined.
Step 10: Fold in Whipped Cream
Gently fold in the whipped cream into the cream cheese mixture until smooth.
Step 11: Assemble Mini Fruit Pizzas
Spread the whipped topping mixture onto each cooled cookie crust generously.
Step 12: Chill Again
Chill assembled pizzas for one hour before garnishing.
Step 13: Add Fruits
Arrange various fruits over each pizza in your desired pattern.
Step 14: Drizzle with Chocolate
Finish off by drizzling melted white chocolate over the fruit-topped pizzas.
Step 15: Final Chill
Let them chill for an additional one to two hours before serving for optimal freshness.
Now you’re ready to enjoy your delicious Mini Fruit Pizzas!
How to Serve Mini Fruit Pizzas
Mini fruit pizzas are a delightful treat perfect for gatherings, parties, or even a special dessert at home. They can be served in various ways to enhance their appeal and flavor.
Individual Servings
- Each mini fruit pizza can be served on its own as a personal dessert. This makes them easy to grab and enjoy without needing any utensils.
Platter Presentation
- Arrange the mini fruit pizzas on a large platter. This allows guests to select their favorites and creates an eye-catching display that showcases the vibrant fruits.
Garnished with Mint
- Add fresh mint leaves on top of each mini pizza for a pop of color and an added layer of freshness. This also enhances the overall presentation.
Accompanied by Whipped Cream
- Serve alongside a bowl of extra whipped cream for those who want an extra dollop on their dessert. It adds richness and complements the fruity flavors.
How to Perfect Mini Fruit Pizzas
To make your mini fruit pizzas truly unforgettable, consider these handy tips that will elevate your creation.
- Use Fresh Ingredients: Always choose ripe, seasonal fruits for the best taste and texture. Fresh ingredients make all the difference in flavor.
- Chill Before Serving: Allow the assembled mini pizzas to chill before serving. This helps set the toppings and enhances the refreshing taste.
- Vary Your Fruits: Experiment with different types of fruits like kiwi, strawberries, or mangoes to create various flavor combinations. Variety adds visual appeal too!
- Drizzle Right Before Serving: To keep the white chocolate drizzle looking fresh, add it right before serving instead of preparing it in advance.

Best Side Dishes for Mini Fruit Pizzas
Pairing side dishes with mini fruit pizzas can complement their sweetness and make your gathering even more enjoyable. Here are some great options:
- Fruit Salad: A fresh mix of various fruits that echoes the flavors in your mini fruit pizzas while adding more health benefits.
- Cheese Platter: A selection of cheeses such as brie or goat cheese offers a savory contrast to sweet desserts, appealing to diverse palates.
- Yogurt Parfaits: Layer yogurt with granola and berries for a nutritious side dish that balances out the sweetness of the mini pizzas.
- Savory Veggies: A plate of crunchy veggies with dip provides a healthy option that contrasts nicely with the sugary treats.
- Pasta Salad: A light pasta salad can be refreshing and filling, making it an excellent companion for sweet desserts like mini fruit pizzas.
- Chocolate Fondue: Offering chocolate fondue gives guests another fun dessert option while playing off the white chocolate drizzle used on the pizzas.
- Ice Cream Cups: Individual cups of ice cream allow guests to mix flavors with their mini fruit pizzas for a delightful dessert experience.
- Sparkling Water: Serve sparkling water infused with citrus slices or berries to provide a refreshing drink option alongside your sweet treats.
Common Mistakes to Avoid
Making Mini Fruit Pizzas can be fun, but it’s easy to make mistakes. Here are some common pitfalls and how to avoid them.
- Using warm cream cheese: Always ensure your cream cheese is softened to room temperature. Warm cream cheese can lead to a lumpy topping.
- Not chilling the crusts: Skipping the chilling step can result in a crust that is too soft. Allowing the crusts to cool properly helps them hold their shape.
- Overmixing the whipped cream: Whipping your cream too long can turn it into butter. Stop when you have soft peaks for a fluffy texture.
- Choosing the wrong fruits: Some fruits release too much juice, making your pizzas soggy. Stick with sturdy fruits like strawberries and blueberries for best results.
- Skipping the white chocolate drizzle: This adds a touch of sweetness and enhances the visual appeal. Don’t forget this step for a complete dessert!
Refrigerator Storage
- Store Mini Fruit Pizzas in an airtight container.
- They will last up to 2 days in the refrigerator.
- Place parchment paper between layers if stacking them.
Freezing Mini Fruit Pizzas
- Freeze without fruit toppings for best results.
- Use a freezer-safe container or wrap each pizza individually in plastic wrap.
- They can be frozen for up to 2 months.
Reheating Mini Fruit Pizzas
- Oven: Preheat to 350°F and warm for 5-10 minutes. This will help restore some texture but is not necessary for serving cold desserts.
- Microwave: Heat on low power for 10-15 seconds as needed. Be cautious not to overheat, as this may affect texture.
- Stovetop: This method is not recommended, as it may cause sogginess.
Frequently Asked Questions
What are Mini Fruit Pizzas?
Mini Fruit Pizzas are delightful desserts featuring a sugar cookie base topped with creamy filling and fresh fruits.
Can I customize my Mini Fruit Pizzas?
Absolutely! You can mix and match fruits based on your preferences or seasonal availability.
How do I make Mini Fruit Pizzas healthier?
Consider using yogurt instead of cream cheese for the topping and opt for lower-sugar fruit options like apples or pears.
Can I use store-bought cookie dough?
Yes, using store-bought cookie dough can save time while still delivering delicious results in your Mini Fruit Pizzas.
Final Thoughts
Mini Fruit Pizzas are not only visually appealing but also versatile, making them perfect for any occasion. Feel free to customize the toppings based on your favorite fruits or seasonal picks. With their creamy texture and sweet crunch, these treats are sure to impress family and friends!
Did You Enjoy Making This Recipe? Please rate this recipe with ⭐⭐⭐⭐⭐ or leave a comment.
📖 Recipe Card
Print
Mini Fruit Pizzas
- Total Time: 48 minutes
- Yield: Approximately 12 servings 1x
Description
Mini Fruit Pizzas are a delightful and visually stunning dessert that everyone will love. With a buttery sugar cookie crust, rich cream cheese topping, and a colorful array of fresh fruits, these mini treats are perfect for parties, picnics, or family gatherings. They are easy to customize with your favorite seasonal fruits, making them both versatile and appealing. The combination of sweet and creamy flavors topped with vibrant fruits makes Mini Fruit Pizzas the ideal dessert to impress your guests while satisfying your sweet tooth. Whether you’re hosting a birthday party or enjoying a cozy night in, these mini delights will surely be the highlight of any occasion.
Ingredients
- 1/4 cup butter
- 3/4 cup sugar
- 1 egg
- 1/8 tsp salt
- 1 tsp cream of tartar
- 1/2 tsp baking soda
- 1 1/3 cups flour
- 1 cup heavy whipping cream
- 8 oz cream cheese (softened)
- 3/4 cup powdered sugar
- Assorted fruits (strawberries, blueberries, kiwi)
- Melted white chocolate (for drizzling)
Instructions
- Preheat the oven to 350°F.
- In a mixing bowl, cream together butter and sugar until fluffy.
- Add the egg, salt, cream of tartar, and baking soda; mix well.
- Gradually incorporate flour until a dough forms.
- Roll out the dough on a floured surface and cut circles using a cookie cutter.
- Place on a greased baking sheet and bake for 15-18 minutes until golden brown.
- Let cool in the refrigerator for about 40 minutes.
- Whip heavy cream until fluffy; set aside.
- Beat softened cream cheese until smooth; gradually add powdered sugar and mix well.
- Fold whipped cream into the cream cheese mixture until smooth.
- Spread topping over cooled cookie crusts and chill for another hour.
- Top with assorted fruits and drizzle with melted white chocolate before serving.
- Prep Time: 30 minutes
- Cook Time: 18 minutes
- Category: Dessert
- Method: Baking
- Cuisine: American
Nutrition
- Serving Size: 1 serving
- Calories: 143
- Sugar: 9g
- Sodium: 77mg
- Fat: 7g
- Saturated Fat: 4g
- Unsaturated Fat: 2g
- Trans Fat: 0g
- Carbohydrates: 17g
- Fiber: <1g
- Protein: 2g
- Cholesterol: 22mg