Homemade Twix Bites are a delightful treat that everyone will love. This easy recipe combines the crunch of vanilla wafer cookies with the gooey goodness of caramel and the rich flavor of chocolate. Perfect for parties, movie nights, or just a sweet indulgence at home, these bites are sure to impress. With minimal ingredients and simple steps, you can create a delicious dessert that tastes just like the classic candy bar!

Jump to:
- Why You’ll Love This Recipe
- Tools and Preparation
- Essential Tools and Equipment
- Importance of Each Tool
- Ingredients
- For the Base
- For the Coating
- How to Make Homemade Twix Bites
- Step 1: Preheat the Oven
- Step 2: Soften the Caramels
- Step 3: Prepare Cookie Base
- Step 4: Shape Caramels
- Step 5: Flash Freeze Bites
- Step 6: Melt Chocolate
- Step 7: Coat Bites in Chocolate
- Step 8: Finish Setting
- How to Serve Homemade Twix Bites
- As Party Favors
- With Ice Cream
- On a Dessert Platter
- With Coffee or Tea
- At Movie Nights
- How to Perfect Homemade Twix Bites
- Best Side Dishes for Homemade Twix Bites
- Common Mistakes to Avoid
- Refrigerator Storage
- Freezing Homemade Twix Bites
- Reheating Homemade Twix Bites
- Frequently Asked Questions
- What are Homemade Twix Bites?
- How do I customize my Homemade Twix Bites?
- Can I use different cookies for this recipe?
- How do I store extra Homemade Twix Bites?
- What is the best way to melt chocolate?
- Final Thoughts
- 📖 Recipe Card
Why You’ll Love This Recipe
- Quick to Make: With only 25 minutes prep time, you can whip up these treats in no time.
- Irresistible Flavor: The combination of crunchy cookies, creamy caramel, and smooth chocolate creates a mouthwatering flavor.
- Versatile Treat: Customize these bites by adding nuts or different types of chocolate to suit your taste.
- Perfect for Sharing: With 24 bites per batch, they’re ideal for gatherings or as a gift for friends and family.
- Easy to Store: These treats last up to two weeks in an airtight container, so you can enjoy them over time.
Tools and Preparation
To make Homemade Twix Bites effortlessly, gather your tools before starting. Having everything ready will streamline the process.
Essential Tools and Equipment
- Baking sheet
- Parchment paper
- Microwave-safe bowl
- Fork
- Freezer-safe sheet pan
Importance of Each Tool
- Baking sheet: Provides a sturdy surface for softening caramels without melting them.
- Parchment paper: Prevents sticking and makes cleanup easier after coating the bites in chocolate.
- Microwave-safe bowl: Ensures safe melting of chocolate chips without burning.
Ingredients
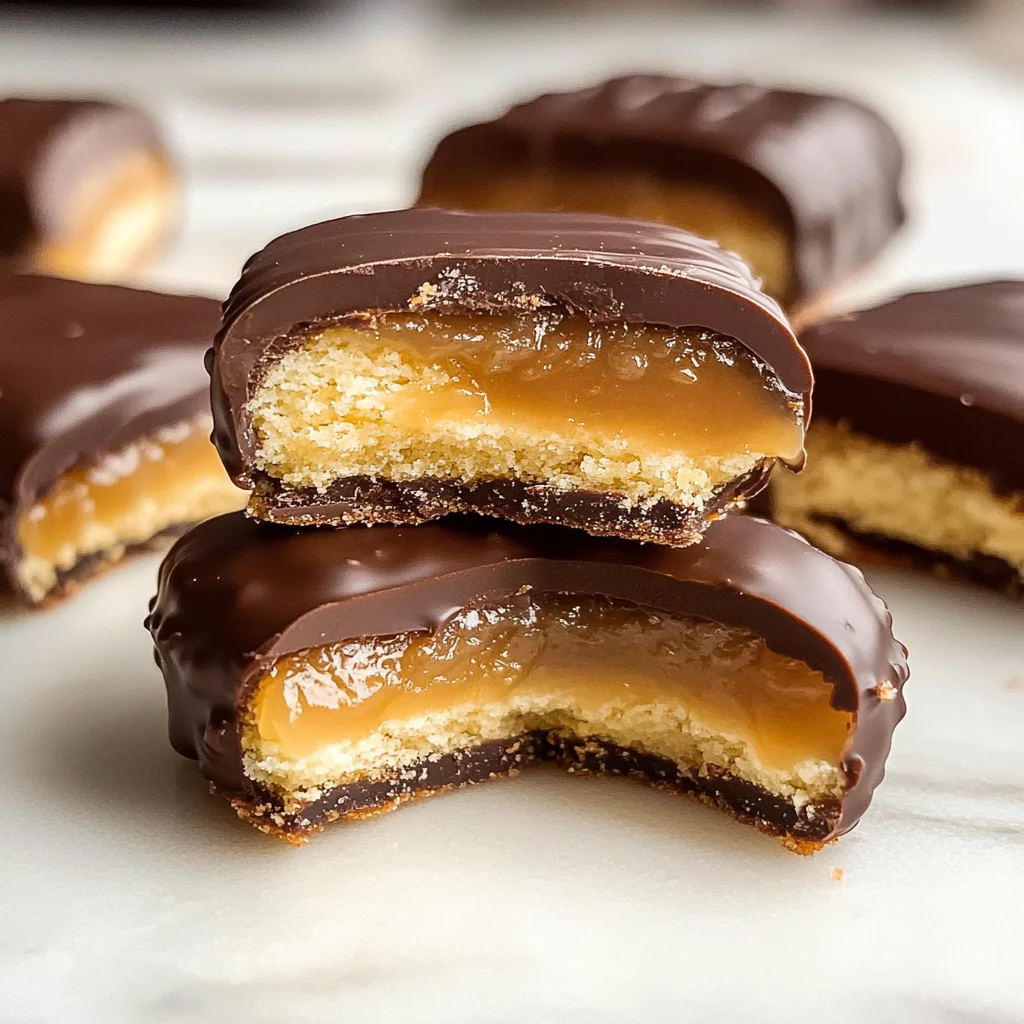
Vanilla wafer cookies topped with sweet, sticky caramel and a rich chocolate coating make Homemade Twix Bites irresistible!
For the Base
- 24 caramel squares
- 24 round vanilla wafer cookies
For the Coating
- 2 cups semi-sweet chocolate chips
How to Make Homemade Twix Bites
Step 1: Preheat the Oven
Preheat the oven to 250°F. Unwrap and place the caramels a few inches apart on a parchment-lined baking sheet.
Step 2: Soften the Caramels
Place the baking sheet on the middle rack of the preheated oven for 5 minutes to soften the caramels. They should not melt; simply soften enough to reshape.
Step 3: Prepare Cookie Base
Meanwhile, arrange the vanilla wafer cookies, bottom sides up, on a small parchment-lined sheet pan that will fit in your freezer.
Step 4: Shape Caramels
Remove the caramels from the oven. While they’re still warm, slightly flatten each caramel into a circle shape that fits each cookie size. Place each flattened caramel on top of each cookie on the sheet pan.
Step 5: Flash Freeze Bites
Place the sheet pan of bites in the freezer for 15 minutes to flash freeze them.
Step 6: Melt Chocolate
When you’re ready to coat the bites in chocolate, place 1 cup of chocolate chips in a microwave-safe bowl. Microwave in 30-second intervals until melted and smooth, stirring between each interval.
Step 7: Coat Bites in Chocolate
Remove half of the flash-frozen bites from the freezer. Using a fork, dip and coat each bite completely in melted chocolate. Let any excess chocolate drip back into the bowl before transferring coated bites to another parchment-lined sheet pan.
Step 8: Finish Setting
Repeat with remaining chocolate chips and frozen bites. Allow all bites to set at room temperature until chocolate is completely firm. Store in an airtight container at room temperature for up to two weeks.
Enjoy your homemade Twix bites!
How to Serve Homemade Twix Bites
Homemade Twix Bites are a delightful treat that can be enjoyed in various ways. Whether you’re hosting a party or simply indulging yourself, these bites can be paired with other snacks or served as part of a dessert platter.
As Party Favors
- Wrap each bite in colorful cellophane for a fun and festive presentation.
- Tie with a ribbon to make them look even more appealing and gift-worthy.
With Ice Cream
- Serve the bites alongside a scoop of vanilla or chocolate ice cream.
- The combination of creamy ice cream and crunchy bites creates an irresistible dessert.
On a Dessert Platter
- Arrange Homemade Twix Bites on a decorative platter with other sweets.
- Include fruits, cookies, and brownies for a well-rounded dessert experience.
With Coffee or Tea
- Pair these bites with your favorite hot beverage.
- The rich chocolate and caramel flavors complement the warmth of coffee or tea perfectly.
At Movie Nights
- Serve Homemade Twix Bites as an easy snack during movie marathons.
- They are perfect for sharing and add a sweet touch to your movie experience.
How to Perfect Homemade Twix Bites
To ensure your Homemade Twix Bites turn out perfectly every time, follow these handy tips.
- Use fresh ingredients: Ensure your caramel squares are fresh for the best flavor and texture.
- Don’t overheat the chocolate: Melting chocolate slowly will prevent it from burning; stir often for smooth results.
- Flash freeze properly: Make sure the bites are well-frozen before coating; this helps keep their shape during dipping.
- Experiment with toppings: Add sea salt or crushed nuts on top of the chocolate layer for extra flavor and texture.
- Store correctly: Keep your bites in an airtight container at room temperature to maintain their freshness.
Best Side Dishes for Homemade Twix Bites
While Homemade Twix Bites are delicious on their own, they pair wonderfully with various side dishes. Here are some great options to consider:
- Fruit Salad
A refreshing mix of seasonal fruits balances the sweetness of the bites. - Cheese Platter
Offer a variety of cheeses; their savory notes provide an excellent contrast to the sweet bites. - Chocolate Fondue
Dip fresh fruits and marshmallows into warm chocolate fondue alongside your bites for extra indulgence. - Cookies and Cream Milkshake
This thick shake is rich and creamy, making it a perfect match for the crunchy bites. - Mini Cupcakes
Small cupcakes offer different flavors that complement the caramel and chocolate in each bite. - Dried Fruit Medley
Provide dried apricots or figs; their natural sweetness pairs well with homemade desserts.
Common Mistakes to Avoid
When making Homemade Twix Bites, it’s easy to overlook some key steps. Here are common mistakes and how to avoid them.
- Overheating the Caramel: If you melt the caramels too much, they will lose their shape. Keep a close eye on them in the oven; they should just soften.
- Skipping the Freezing Step: Not freezing the bites before coating can lead to messy chocolate application. Always flash freeze them for at least 15 minutes.
- Improper Chocolate Melting: Microwaving chocolate for too long can cause it to seize. Use short intervals and stir in between for a smooth consistency.
- Not Using Parchment Paper: Placing the bites directly on a sheet pan can cause sticking. Always line your pan with parchment paper for easy removal.
- Storing Incorrectly: Leaving the bites out in warm environments can make them too soft or sticky. Store them in an airtight container at room temperature or refrigerate.
Refrigerator Storage
- Store Homemade Twix Bites in an airtight container.
- They will last up to 2 weeks in the refrigerator.
- Ensure the container is sealed tightly to maintain freshness.
Freezing Homemade Twix Bites
- You can freeze these bites for up to 3 months.
- Place them in a freezer-safe bag or container.
- Separate layers with parchment paper to prevent sticking.
Reheating Homemade Twix Bites
- Oven: Preheat your oven to 200°F and warm the bites for about 5-10 minutes, just until slightly soft.
- Microwave: Heat on low power for about 10-15 seconds. Monitor closely to avoid melting completely.
- Stovetop: Place a small amount of water in a pot and use a heat-safe bowl above it (double boiler method) to gently warm without direct heat.
Frequently Asked Questions
What are Homemade Twix Bites?
Homemade Twix Bites are bite-sized treats made from vanilla wafer cookies topped with caramel and coated in chocolate, mimicking the classic candy bar.
How do I customize my Homemade Twix Bites?
Feel free to add toppings like sea salt, chopped nuts, or drizzle different types of chocolate over your bites for added flavor.
Can I use different cookies for this recipe?
Absolutely! While vanilla wafers are traditional, any cookie that provides a sturdy base will work well, such as shortbread or graham crackers.
How do I store extra Homemade Twix Bites?
Store any leftovers in an airtight container at room temperature for up to two weeks or freeze them for longer storage.
What is the best way to melt chocolate?
The best way is using a microwave in short bursts or a double boiler method on the stovetop to ensure even melting without burning.
Final Thoughts
Homemade Twix Bites offer a delightful combination of flavors and textures that are sure to please everyone. They’re versatile, allowing you to customize with different toppings or cookie bases. Give this simple recipe a try and enjoy these delicious treats anytime!
Did You Enjoy Making This Recipe? Please rate this recipe with ⭐⭐⭐⭐⭐ or leave a comment.
📖 Recipe Card
Print
Homemade Twix Bites
- Total Time: 30 minutes
- Yield: Approximately 24 bites 1x
Description
Indulge in the delightful experience of Homemade Twix Bites, a simple yet scrumptious treat that perfectly mimics the classic candy bar. This easy-to-follow recipe features crunchy vanilla wafer cookies topped with gooey caramel and enrobed in rich chocolate, making them an irresistible snack for any occasion. Whether you’re hosting a party, enjoying a movie night, or just treating yourself, these bite-sized delights are sure to impress. With only a few ingredients and minimal preparation time, you can create a batch that will satisfy your sweet cravings.
Ingredients
- 24 caramel squares
- 24 round vanilla wafer cookies
- 2 cups semi-sweet chocolate chips
Instructions
- Preheat oven to 250°F. Arrange unwrapped caramels spaced apart on a parchment-lined baking sheet.
- Bake for 5 minutes to soften the caramels slightly.
- Place vanilla wafers bottom-side up on a separate parchment-lined sheet pan.
- Flatten softened caramels and place them on top of each cookie.
- Freeze for 15 minutes to firm up the bites.
- Melt chocolate chips in a microwave-safe bowl, stirring until smooth.
- Dip each frozen bite in melted chocolate and place on another lined sheet pan to set.
- Allow bites to cool until chocolate hardens fully; store in an airtight container.
- Prep Time: 25 minutes
- Cook Time: 5 minutes
- Category: Dessert
- Method: Baking
- Cuisine: American
Nutrition
- Serving Size: 1 bite (30g)
- Calories: 132
- Sugar: 10g
- Sodium: 30mg
- Fat: 7g
- Saturated Fat: 4g
- Unsaturated Fat: 2g
- Trans Fat: 0g
- Carbohydrates: 16g
- Fiber: 0g
- Protein: 1g
- Cholesterol: 5mg